Saturday, December 31, 2016

Birthday Bear Hugs


Hi everyone!  My great-niece Ava had a birthday on Thursday and her party is today.  She's only seven, so I wanted something cute and girly.  I love this bear set, it's so cute!  I colored everything with copic markers.  The pink rectangle was created by putting masking tape around the perimeter of the panel and sponging pink ink on it.  I added white dots on the cake as well as yellow stickles on the flames of the candles.  I sprayed the panel with Shimmer Spritz.  Love that stuff!  I'm using it on everything!  I stamped the sentiment on a banner.  The pattern paper was a perfect match for the colors I chose.
 
I hope everyone has a great New Year's Eve!  Have fun!
 
Thanks for stopping by!
 
Recipe
Stamps:  Beary Special Birthday (MFT)
Paper:  Recollections white, Perfectly Plaid dp (Lawn Fawn)
Ink:  Versafine onyx black, Memento tuxedo black, copic markers, picked raspberry
Accessories:  Beary Special Birthday dies (MFT), Banner Trio die (WP9), shimmer spritz, yellow stickles, dimensional tape
Photobucket

Friday, December 30, 2016

Sending You Heartfelt Sympathy

Hey friends!  I love having time off so I can get my craft on for no reason other than to have fun!  The other night I was up until 11:00 at night organizing new stamps!  (There were lots to organize, label, and put away!)
 
I just got this stamp set from Altenew yesterday so it was on my table ready to go.  I stamped the flower on some smooth white Bristol cardstock in Versamark and embossed it in white.  Then I masked it and stamped the leaves in the same way.  I wanted a soft look, so I used Zig Clean Color markers very sparingly and moved the color around with a water brush.  It was just the intensity I wanted.  I also wanted the sentiment in a softer ink, so I used SU's smoky slate.  I stamped it using the MISTI and stamped it three times to get the look I wanted.  I die cut the panel with a wonky stitches die and then sprayed it with Shimmer Spritz.  Sequins finished it off and I attached the panel to the base with dimensional tape. 
 
I'm entering this in the Simon Says Stamp Wednesday challenge.  It's an Anything Goes challenge.
Thanks for stopping by!
 
Recipe
Stamps:  Beautiful Day (Altenew), Sending You (PTI)
Paper:  Bristol smooth white, Recollections white
Ink:  Versamark, smoky slate, Zig Clean Color markers
Accessories:  Wonky Stitches (Avery Elle), white embossing powder, sequins, dimensional tape, Shimmer Spritz, masking paper, Mini MISTI


Photobucket

Thursday, December 29, 2016

Time Out #73 Reminder - Inspired by Words Challenge

Hi everyone! 
I'm here with a reminder for our current Time Out challenge.  This time it's our Inspired by Words challenge.  The quote for the challenge is
With each sunrise we are given a chance for a new beginning.
 
This quote reminded me of a picture I took last year at church on Christmas day.  It was a new banner hanging beside the altar and I knew I could translate it into a card.
 
Which is just what I did!  I think it turned out pretty much as I envisioned.  I started by using masking tape and sponged Wild Honey distress inks onto the white card panel.  I also sponged the same ink onto some white cardstock that I die cut with some rolling hills dies.  I stamped the manger in chocolate ink and die cut the silhouettes in chocolate cardstock.  They were all attached to the white cardstock.  I stamped the sentiment and star and added a crystal to the center of the star. 
 
You can see more from the design team and our guest on the Time Out blog.
 
Thanks for stopping by!
 
Recipe
Stamps:  Nativity Silhouettes (PTI)
Paper:  Recollections white, chocolate chip
Ink:  Wild honey, chocolate chip
Accessories:  Nativity Silhouettes dies (PTI), Build a Scene Rolling Hills dies (TE), crystal

Photobucket

Wednesday, December 28, 2016

Thank You cards!

Hi friends!
 
I had to make a few thank you cards for gifts I received this Christmas.  I saw this post on the Taylored Expressions blog and thought these cards were so colorful and beautiful.  However, I wanted something with snowflakes.  So I searched my stencils and cover plates and found one of each I could use.  Here's the first card I made.
 I used a very intricate stencil on this card.  I had to pounce the ink onto the cardstock for fear of breaking the delicate parts of the stencil. I wanted to use white snowflakes, but they sort of got lost on the panel.  So I used colored cardstock to match some of the inks.

Here's the next card.  I thought I was going to lose my mind on this one!  I die cut this cover plate with masking paper.  OMGosh trying to get all those little pieces out was tedious to say the least!  I had pieces stuck to my fingers, clothes, the floor...all over everything!  And the mask could only be used once, so there is only one of these!  I used the same colors, however I didn't have to pounce the ink over the mask.  I could sponge it on.  The colors are a bit more intense.  There is shimmer spritz on the snowflakes too.
 
These took much longer than I anticipated because of the intricacies of the stencil and die, but I enjoyed the time making them.
 
Thanks for stopping by!
 
Recipe
Stamps:  Hand lettered thanks, Fanciful feathers (WP9)
Paper:  Recollections white, calypso coral. crushed curry, bermuda bay
Ink:  Salty ocean, cracked pistachio, fossilized amber, abandoned coral, Versafine onyx black
Accessories:  Let it snowflake dies (MFT), Snowflake fusion cover up (MFT), Winter snowflake stencil (Memory Box), shimmer spritz, masking paper, corner rounder

Photobucket

Tuesday, December 27, 2016

Another Christmas Card!

Hi friends!  I hope you had a Merry Christmas if you celebrate this wonderful holiday!  We had a nice time visiting family and a few friends as well!
 
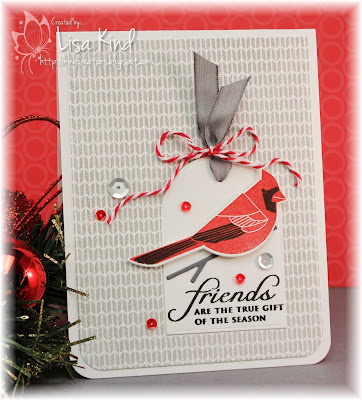
I had to make a few last minute Christmas cards and I'm just getting around to posting them, well one actually.  I made about six of these!  I made this same card last February or March as a birthday card, and at that time thought it would make a great Christmas card.  So I took that design and did just that!
 
I started with the background stamp and stamped it in gray ink.  Then I went to work on the cardinal.  I die cut it first, then stamped it in red and black inks.  I die cut a tag, attached the gray branch (which was also die cut) and stamped the sentiment.  I added the ribbon and twine and then the bird with dimensional tape.  The tag was attached to the base and I added some sequins to finish it off. 
 
Thanks for stopping by!
 
Recipe
Stamps:  Winter Woods (PTI), Believe (PTI), Sweater Stitch bg (MFT)
Paper:  Recollections white, gray
Ink:  Smoky slate, real red, Versafine onyx black
Accessories:  Winter Woods dies (PTI), Rounded Banner STAX die (MFT), corner rounder, ribbon, twine, sequins, dimensional tape

Photobucket

Saturday, December 17, 2016

Just Us Girls #374 - Color Week

Hi everyone!  I'm the hostess for this week's Color Week Challenge over at Just Us Girls.  I saw these colors on a colleague's dress and thought it was very interesting. 
 
I've been wanting to use these mittens from My Favorite Things.  I don't see them on there site, so I'm assuming they are discontinued.  Funny that they are discontinued and this is the first time I'm using them!  My motto:  Too many stamps/dies, not enough time!
 
Anyway, I die cut them from white cardstock and stamped them in the navy and orchid inks.  I love them!  They are so cute, and I can see stamping them in a bunch of different colors, can't you?  The background was stamped using the Sweater Stitch background stamp.  I added some gold hearts to the mittens that the gold "string" is attached to.  Added the sentiment and I was done.  (I wish the card came together as easy as it was to write this up!)
 
You can see more from the JUGs design team and our guest, Teresa, on the JUGs blog.  This is Teresa's last week with us.  We loved her creations!
 
As a note, the JUGs blog is taking a much needed break for the holidays.  We will be back with new challenges on Saturday, January 7, 2017.
 
Happy Holidays!
 
Recipe
Stamps:  Cozy Mittens and Sweater Stitch BG (MFT), Quilted: Winter (PTI)
Paper:  Recollection white, night of navy
Ink:  Lavender lace (SU), Desert night (Altenew), Delicata gold
Accessories:  Audrey Cutaways (Winnie & Walter), Banner Trio (WP9), gold metal hearts, fun foam

Photobucket

Saturday, December 10, 2016

Just Us Girls #373 - Trend Week

Hey everyone!  How are you all doing with your Christmas shopping, decorating, and card making?  I'm almost done shopping, decorating is happening this weekend (we got our tree yesterday), but I'm far behind on my Christmas card making!  But I've got one today for the Just Us Girls Trend challenge.  The trend this week is JARS
 
Of course I had to pull out the Friendship Jar stamps and dies.  I die cut the jar to make a shaker card.  I stamped the peppermint candies (I stamped them in red, but didn't color them in) and added some glitter for the shaker bits.  The word die was die cut three times and stacked.  I added that bow at the last minute...it needed something to spiff it up a bit!  I spritzed the entire card with Shimmer Spritz...it really sparkles!   Sequins, of course!
 
You can see more from the JUGs design team and our December guest on the JUGs blog.
 
Thanks for stopping by!
 
Recipe
Stamps:  Friendship Jar, Friendship Jar Fillers Holiday, City Scene Christmas Sentiments (all PTI)
Paper:  Recollections white, garden green, real red, North Pole (Doodlebug)
Ink:  Garden green, real red
Accessories:  Friendship Jar die, Christmas Cheer die (PTI), Basic Bow die (TE), glitter, acetate, Shimmer Spritz, sequins, dimensional tape

Photobucket

Thursday, December 8, 2016

Time Out Challenge #72 - CASE Challenge

Hi everyone!  It's time for a new Time Out Challenge and this time we are CASE-ing a card.

This is the lovely card by Kim that we are case-ing for this challenge.


And this is my take on the challenge.  I have to admit that I got this idea for this layout from another blog, however I do not know whose blog!  The idea just stuck in my head.  I drew a circle with the die, then pulled out all the stamp sets with snowflake stamps and chose four or five of them in various sized to use.  I started with the largest one then worked my way around with the different colored inks.  I used similar colors that are in the challenge card.  Then I die cut the circle and mounted the stamped piece onto the base using dimensional tape.  I die cut another circle from a scrap piece of white cardstock, stamped the sentiment on it and adhered it in the opening.  I added sequins and some shimmer to the snowflakes with a spectrum noir pen.
 
You can see more from the Time Out design team and our guest for this challenge, Deepti, on the Time Out blog.

Thanks for stopping by!
 
Recipe
Stamps:  Seasonal Sentiments (MFT), various snowflake stamps
Paper:  Recollections white
Ink:  SU inks:  celery, daffodil delight, lavender lace, tempting turquoise, real red; Hero Arts:  bubble gum; Versafine onyx black
Accessories:  Cross stitch circle STAX die (MFT), sequins, dimensional tape, spectrum noir crystal clear

Photobucket


Tuesday, December 6, 2016

Baby, Baby, Baby

Hi friends!  I needed a baby girl card for a friend who is expecting right before Christmas.  I wanted to do some copic coloring, but that wasn't working for me last night.  Next choice was watercoloring a background.  I first embossed this gingham background stamp with white embossing powder on watercolor paper, then used some distress ink and watercolored over it.  I settled on just die cuts for the rest of the card.  It was getting late and I was running out of ideas! Each one is stacked with three layers of cardstock and shimmered with a spectrum noir pen.  The bow was done in the same manner.  I added sequins (of course!) and rounded the corners.
 
I should be making more Christmas cards!  I need quite a few and only have about five!  One will be posted on Thursday for the Time Out challenge.  Hope to see you then!
 
Thanks for stopping by!
 
Recipe
Stamps:  Gingham background (MFT)
Paper:  Recollections white, watercolor paper
Ink:  Versamark, picked raspberry distress ink
Accessories:  Wonderful Words: Baby die (PTI), Basic Bow Embossing die (TE), spectrum noir crystal clear pen, sequins, fun foam


Photobucket

Saturday, December 3, 2016

Just Us Girls #372 - Word Week

It's Word Week over at Just Us Girls and Nancy chose an appropriate one for this time of year...Christmas Tree.
 
An easy one, but the tough thing was which Christmas tree do I use from my stamp and die collection?  THAT was a tough one!  I settled on this tree die from Paper Smooches.  I die cut it from white glitter paper.  I also wanted to make a tag to play along in the Tag You're It challenge.  I used a piece of Distress Specialty Stamping paper and sponged Twisted Citron and Peacock Feathers on it.  Then I spritzed it with water.  I love how it looks like snow falling or even lights glimmering.  I stitched the parts of the tag together with twine and added the sentiment.  I tied it off with satin ribbon and more twine.
 
Here's the link to the Tag You're It challenge.
 
You can see more from the JUGs design team on the JUGs blog.
 
Thanks for stopping by!
 
Recipe
Stamps:  Tiny Tag Sayings (Lawn Fawn)
Paper:  Distress Specialty Stamping paper, white cardstock, white glitter paper
Ink:  Twisted citron, peacock feathers, Archival jet black ink
Accessories:  Evergreens die (Paper Smooches), Stitched Tag die (PTI), twine, ribbon


Photobucket

Saturday, November 26, 2016

Hello friends!  Just Us Girls has a great photo challenge going on and this is the lovely photo we have to inspire you this week!
 
I took some inspiration from Kay Miller as well in this post.  I created a simple box and then die cut the gift box from purple checked paper and the bow from silver paper and adhered it to the box.  The sentiment was die cut three times and layered to make it more dimensional.  Easy peasy!
 
You can see more fabulous inspiration from the JUGs design team and our November guest on the JUGs blog.
 
Thanks for stopping by!
 
 Recipe
Paper:  Irresistibly Yours (SU), Gingham linen rainbow petite prints (Doodlebug), silver shine (MFT)
Accessories:  Wrap It Up die (PTI), Season's Greetings die (SSS)

Photobucket

Thursday, November 24, 2016

Time Out Challenge #71 - Theme Challenge

Hello and Happy Thanksgiving to my American friends!  I hope you are all stuffing yourself with delicious food and spending quality time with your loved ones!  I know that's what I'll be doing today!
Image result for thanksgiving images
 
The new challenge over at the Time Out blog is a Theme Challenge.  The theme this time is Christmas with the optional twist of using glitter and/or shimmer.  I love glitter and shimmer!

I made a very simple card today.  I started by die cutting this ornament die from white glitter paper.  I adhered it to a red piece of cardstock that was run through an embossing folder.  Then I added some clear sequins and was done.  I was going to add a sentiment, but I liked it the way it was:  simple and elegant!
 
You can see more from our Time Out design team and our guest for this challenge, Valentyna, on the Time Out blog.
 
Thanks for stopping by!
 
Recipe
Paper:  White, red, white glitter paper
Accessories:  Peyton Ornament die (SSS), Quilted embossing folder (We R Memory Keepers), sequins

Photobucket

Sunday, November 20, 2016

Congratulations on Your Engagement

Hi friends!  I have a very special card to share today.  My niece Stephanie got engaged over the Columbus Day weekend.  Her now fiancé, Chris, proposed to her at the top of a ski hill in a popular ski resort just outside of Buffalo, NY.  They rode the chairlift up and when they got up there, he said that this would be a great place for a wedding or an engagement.  It was so beautiful in the fall with all the beautiful leaves changing.  He then got down on his knee and proposed.  He's such a sweet guy and perfect for Stephanie.
 
Today we are celebrating their engagement with a dinner at Stephanie's mom's house.  I bought them a pretty Kate Spade frame to house their engagement or wedding photo.  I of course had to make a card.  Stephanie wants to get married next fall and wants royal blue as her theme color.  So I thought I'd use some blue foil to create this card.  I ordered the foil and this stamp set from SSS and it just arrived yesterday!  I had to stamp it on cardstock and take it to Office Max to have them copy it on  their laser printer (I don't have one).  Then I was able to foil it.  It's difficult here to see the shine of the foil.

You can see the shine of the foil in this photo.  I just added more shimmer with sequins and a silver heart.  I matted the main panel on navy cardstock, and that's mounted on fun foam for some dimension.

I also stamped the envelope with the same flourish and a sentiment that says "Mr. & Mrs. to be".
 
Here's a great photo of Stephanie and Chris.  They usually take goofy photos together (I'm worried about the wedding photos!  LOL!).  I wanted to print one of the goofy photos and put it in the frame, but I didn't think of it before the store I bought the frame from wrapped it!
 
Thanks for stopping by today!
 
Recipe
Stamps:  Mr. and Mrs. (Clearly Besotted)
Paper:  White, night of navy
Ink:  Night of navy
Accessories:  Audrey Cutaways (Winnie & Walter), foil, mini Minc, sequins, fun foam

Photobucket

Saturday, November 19, 2016

Just Us Girls #370 - Color Week

Hey everyone!  It's color week over at Just Us Girls and we have some very pretty colors to work with.
 
I chose to work with this mosaic stencil and purple and teal inks.  I used a metallic gold pen to draw the strings the ornaments are "hanging" from and some pretty shiny bow die cuts.  I also spattered some gold water color on the card front.  Not sure how I like that, but it was either that or sequins (which I use on every card!).
 
You can see more from the JUGs design team and our November guest on the JUGs blog.
 
Thanks for stopping by!
 
Recipe
Stamps:  Believe
Paper:  White, Lovely Lilac, shiny gold
Ink:  Versafine oynx black, high dive, wisteria
Accessories:  Audrey cutaways die (Winnie & Walter), Basic bow embossing die (TE), mosaic ornaments stencil, Gansai Tambi Starry Colors watercolor, gold metallic pen
Photobucket

Sunday, November 13, 2016

Wishing You a Happy Anniversary

Hello friends!  The Just Us Girls challenge this week is to use metallics.  I created a few things with metallics for this challenge for my design team card, so here's another that I created.
 
My best friend's sister and brother-in-law celebrated their 45th anniversary, and I made this card for them.  I started by die cutting the gold piece and adhering it to a white card base.  I love this gold paper from MFT!  It's so shiny!  Then I pulled out some older Spellbinders dies and cut the black and white pieces.  I added the sentiment and sequins and was done.  They loved the card!
 
You can still play along with the JUGs challenge until Thursday. 
 
Thanks for stopping by!  I'll be posting tags I made using metallics soon!
 
Recipe
Stamps:  Wishing You (PTI)
Paper:  White, black, gold shine (MFT)
Ink:  Versafine onyx black
Accessories:  Wrappers Delight: Lattice die (Lil Inkers), Spellbinder dies, sequins, dimensional tape
Photobucket

Saturday, November 12, 2016

Just Us Girls #369 - Trend Challenge

Hi there!  Do you follow trends?  Just Us Girls has a great trend challenge this week.  We are using metallics!
 
I made a bunch of things with metallics for this challenge, but settled on this one to post.  I'll post the others later.  For this one, I started with the snowflake cover plate in white and mounted it on a black base.  The bow die is a new one from Papertrey Ink.  I die cut it from gold paper and layered the bow with dimensional tape. I just added sequins and was done.  This will be a Christmas card when I finish the inside!
 
You can see more from the JUGs design team and our November guest on the JUGs blog.
 
Thanks for stopping by!
 
Recipe
Paper:  White, black, goldshine (MFT)
Accessories:  Snowflake fusion cover up die (MFT), Layered gift bow die (PTI), sequins

Photobucket

LinkWithin

Blog Widget by LinkWithin