Thursday, January 30, 2014

Another Stenciled Card!

Oh my goodness, I was so inspired by the Stenciled class from Online Card Classes!  I have another card to share based on a technique I learned from the class.
 
I cased the card Jennifer McGuire did.  I didn't have the butterfly stencil she used, but I was browsing around in Hobby Lobby the other day and found a stencil with two butterflies on it for $2.99.  Score!  So here's the technique.  Apply various inks through the stencil lightly.  I used Hero Arts inks, but Distress Inks work really well also.  Then I placed another stencil (I used the Large Lotus Flower stencil from Hero Arts) with some design to it right on top of the butterfly opening.  I applied the same inks in the same places using a heavier hand.  When you remove the stencils, this is what you end up with.  Very cool technique!  The thank you die was cut several times from turquoise, pink and white card stock and glued together to make it more dimensional.  I added some Wink of Stella shimmer and glossy accents for some shine.  The butterfly didn't look finished until I added the pearls to its body.  (I need a new camera.  My pictures just aren't doing it for me anymore!)
 
That's it!  Thanks for stopping by!
 
Recipe
Stamps: None!
Paper:  Neenah white, regal rose, tempting turquoise
Ink:  Butter bar, fresh peach, pale tomato, bubble gum, tide pool (Hero Arts)
Accessories:  Butterfly stencil (Hobby Lobby), large lotus flower stencil (Hero Arts), Wonder Words: Thank You die (PTI), Wink of Stella shimmer brush, glossy accents, pearls
 
Photobucket

Wednesday, January 29, 2014

Cure for the Monday Blues #2

Hi everyone!  I was home yesterday because of a snow day.  I'm hoping I'm not home today (I wrote this yesterday).  We don't need anymore snow days, even though I love snow days, because they are starting to take them away from our vacations!
 
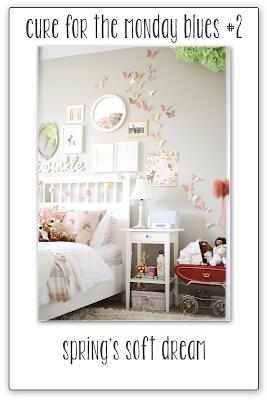
Anyway, I came across this new challenge called Cure for the Monday Blues and thought I'd give it a go.  This is their inspiration photo.  See the wall hanging beside the bed with the deer and sun rays?  That was my inspiration.
 
Since I took the Stenciled class from Online Card Classes, I pulled out my stencil and embossing paste.  In the class, they demonstrate coloring the embossing paste, so that's what I did here.  I used one small drop of Groovy Guava reinker to the paste and mixed it in.  It was the exact color I was looking for to match the inspiration photo.  The butterflies were cut from a die and decorative paper.  The cute deer is a rubber stamp from Paper Makeup Stamps called Felicity the Fawn which is only available in digital form now.  It had a flower in its mouth, but I cut it off and added a small butterfly on its nose.  I stamped it on some gray decorative paper from a SU pad and fussy cut it out.  I took a Signo white gel pen and colored in the spots and flowers on its back, the dot on its cheek, and its eyes.  Wink of Stella shimmer brush was used on the butterflies for some shine.  I had enough of this colored embossing paste to make another background so you'll be seeing it used sometime soon here on the blog!
 
 If you haven't taken any of these classes, I would highly recommend them.  The tutorials are wonderful and you have access to them for life.  I refer to them often.
 
Thanks for stopping by!
 
Recipe
Stamps:  Felicity the Fawn (PMS)
Paper:  Neenah white, blush blossom, Porcelain dp (BG)
Ink:  Versafine onyx black, groovy guava reinker
Accessories:  Shine stencil (Memory Box), Butterfly Delights die (Memory Box), signo white gel pen, Wink of Stella shimmer brush, embossing paste

Photobucket

Tuesday, January 28, 2014

Merry Monday and Mojo Monday

Happy Snow Day (again!)!  I didn't really want this snow day.  We are over our days and now they are taking from other vacation days.  This one will probably take away our Friday before Memorial Day, which is the day I go shopping at the local nurseries for my flowers.  But it was only 1 degree this morning and the wind chill was -25 degrees, so it was necessary.  So since I was home, I went to my craft room.  I made two cards, but I'll share one today and one tomorrow.
This one I love!  I love the Merry Monday Challenges and really want to play along more often to get some cards done.  This week their challenge is to use ornaments.  I've have these tag dies from MFT for a while and I purchased them because they look like ornaments to me.  I die cut them out of decorative paper and then just the tops from foil tape paper for the top of the ornament.  Love it! 
 
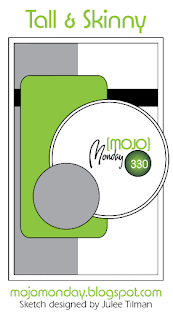
I'm also playing along with the Mojo Monday challenge.  They've changed up their round or square challenge (I don't like making round cards!) to tall and skinny!  This I like!  My card is 3.5" x 5.5" so it still fits into an A-2 envelope (but who cares if you have an envelope maker, right?), but it's so cute being so skinny!
 
Thanks for stopping in today!  Hopefully I'll be at work tomorrow!
 
Recipe
Stamps:  Take a Bough (PTI)
Paper:  Neenah white, North Pole (Doodlebug), foil tape sheets (Ranger)
Ink:  Versafine onyx black
Accessories:  Decorative circle tag stax (MFT), enamel dots (Teresa Collins), washi tape, baker's twine

Photobucket

Sunday, January 26, 2014

Stenciled!

Hello friends!  I spent some time in my stamp room yesterday after watching videos from the Stenciled class from Online Card Classes.  Love those classes!  I made three cards based on their tutorials, but one right at the end messed up!  Don't you hate that?  I'll hopefully redo it today and post it tomorrow.

One of the tutorials is taught by my new stamping idol, Jennifer McGuire.  I created this card based on one she did in the class.  I used a stencil from Memory Box and first sponged some Butter Bar ink through the stencil.  I then moved it a little horizontally and sponged Pale Tomato ink (I think!) over it.  Before inking, I blocked off a spot on the cardstock to place my sentiment later.  After inking the background, I put some bridal embossing powder on top (it is a clear ep with glitter in it...the glitter was all over the place!) and heat embossed it.   It shimmers so nicely!  I added the sentiment and created the rolled gardenia flower and leaves from felt.  I also added a pearl to the center of the flower and some floral pins, to which I added more pearls to match.  Love the colors!

So while I was creating the card above, I made a mistake.  I forgot to block off the cardstock for the sentiment.  I was going to toss it, but took another look at it.  Debby Hughes had a tutorial that looked something like this, so I created a card based on hers.  I cut a tag shape using a Spellbinder's die from vellum.  The sentiment and flourish on the bottom was embossed with white ep.  I added the bow die so I had somewhere to attach the vellum to the card.  This is going to my niece who just made the Dean's List!
 
Thanks for stopping by!

Recipe:  Birthday Wishes card
Stamps:  Birthday Style (PTI)
Paper:  Cameo coral, Neenah white
Ink:  Butter bar, pale tomato, Versafine onyx black
Accessories:  Rolled gardenia die (MFT), bridal ep, texture tessatina stencil (Memory Box)

Recipe:  Awesome card
Stamps:  We Go Together and Half & Half (PTI)
Paper:  Neenah white, marigold morning, vellum
Ink:  Versamark ink, butter bar
Accessories:  Basic bow die (Taylored Expressions), Spellbinder's tag die, twine, crystals, white ep

Photobucket

Saturday, January 25, 2014

Just Us Girls #225 - Photo Inspiration Challenge and January Papertrey Blog Hop Challenge

Hi everyone!  It's getting closer to Valentine's Day, and Just Us Girls has a great photo inspiration challenge for you to help you get those Valentine cards done.  Marisa chose this great photo to inspire you.

Here's a larger picture.  Lots of different ways to be inspired by this photo, don't you think?

I was also inspired by the Papertrey Ink blog hop challenge photo here.
 
So after all that inspiration, this is what I came up with.  I used a some pink cardstock, modeling paste, and the chevron pattern stencil from Simon Says Stamp for the background.  The love word was die cut seven times:  four times from white cardstock, twice from a dark pink, and once from pink glitter paper.  I then stacked them together with the dark pink in the middle.  I also stacked the heart in the same manner.   The heart was added to the banner with the sentiment.  The little  hearts were punched with a Martha Stewart heart border punch.
 
Here is a side view of the die cuts.  I saw this on someone's blog, but I can't remember whose blog.  I had this idea in head ever since I saw it.  I love that pink in the middle!
 
I used this week's CAS(E) this Sketch, and actually CASED Lynn Mangan's card.  She's the guest there this week.  I love her style!
 
 
You can see more inspiration from the JUGs team on these blogs.
 
 
Thanks for stopping by!
 
Recipe
Stamps:  Wonderful Words: Love (PTI)
Paper:  Neenah white, pink pirouette, pink glitter paper
Ink:  Versafine onyx black
Accessories:  Wonderful words: love die, WPlus9 banner die, Martha Stewart heart border punch, Golden modeling paste, chevron pattern stencil (Simon Says Stamp), corner rounder
 
Photobucket

Wednesday, January 22, 2014

Retro Sketches #98 - With Sympathy

Hi friends!  I have another sympathy card to share, only this time it's for the loss of a beloved pet.  Our dear friends recently lost their beautiful Bernese Mountain dog, Zoe, to cancer.  She was only 6 1/2 years old.  We all loved Zoe.  She had a very sweet personality and will be missed especially by my dog, Lizzie.  She and Zoe were very best friends.
 
Bernese Mountain dogs are black with a little brown and white markings.  I tried to find paper that incorporated those colors.  I chose the Little Black Dress pad from Basic Grey.  The butterfly was die cut from a brown piece from the pack and I added some pearls for the body and Wink of Stella shimmer brush.  In the picture it looks leathery.  The sentiment is from PTI and was stamped in Versamark and embossed with white embossing powder.
 
I used this week's sketch from Retro Sketches.
 
Thanks for stopping by!
 
Recipe
Stamps:  With Sympathy: Loss of Pet (Papertrey Ink)
Paper:  Vintage cream, Little Black Dress (Basic Grey)
Ink:  Versamark
Accessories:  Beautiful Butterflies die (PTI), white embossing powder, pearls, corner rounder, Wink of Stella shimmer brush

Photobucket

Tuesday, January 21, 2014

CAS(E) This Sketch (again!)

Hi again!  Three posts in three days is really not like me, but on Sunday I was on a roll! 
 
Today's Valentine card is for my hubby.  I remembered I had this image when I went to my LSS last week and saw it there.  I had to search for it, but found it.  And guess what?  It has never seen ink, of course!  Glad I could ink it up today!  It was inked with Archival Jet Black ink so I could watercolor.  I'm really enjoying watercoloring lately!  I used Going Gray, Really Rust, and Certainly Celery reinkers.   The dp is Basic Grey's Kissing Booth.  I love how masculine these papers are.  The little hearts were punched from Really Rust paper, then covered with Wink of Stella shimmer brush and Glossy Accents.  I added Glossy Accents to parts of the mower also.
 
The sketch is from this week's CAS(E) This Sketch.
 
That's it!  You probably won't be hearing from me until Saturday's Just Us Girls post...but you never know!  Thanks for stopping in!
 
Recipe
Stamps:  Whipper Snapper designs
Paper:  Vintage cream, Kissing Booth (Basic Grey), black
Ink:  Archival jet black;  going gray, certainly celery, really rust reinkers
Accessories:  Martha Stewart heart border punch, Wink of Stella shimmer brush, glossy accents


Photobucket

Monday, January 20, 2014

Sweet Sunday Sketch and CAS(E) This Sketch Challenges

Sweet Sunday Sketch Challenge

Hello again!  I've got two Valentine cards to share with you today.  Yesterday I was working with Basic Grey's Kissing Booth paper pack and made a couple of cards with it.  I posted one yesterday, which you can see here
 
On this one, I cut the floral pattern using a Spellbinder's die.   The vertical pink piece and the banner were cut with a paper trimmer.  I stamped the heart border on the banner with Rose Bud Memento Luxe ink.  The larger hearts are from a Martha Stewart punch.  I added some shimmer with a Wink of Stella brush and then covered them with Glossy Accents for some shine.  Each of the hearts in the border were also covered with the Wink of Stella brush.  The cream background was run through a script embossing folder.
 
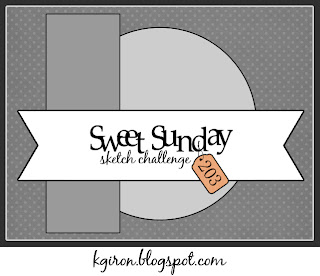
I used this week's Sweet Sunday Sketch for my layout.  Glad that Karen is doing them weekly again!
 
Recipe
Stamps:  Hearts on Fire (Verve)
Paper:  Vintage cream, melon mambo, Kissing Booth (Basic Grey)
Ink:  Rose Bud (Memento Luxe), Versafine onyx black
Accessories:  Spellbinder's circle die, Martha Stewart heart border punch, Wink of Stella shimmer brush, Glossy Accents, script embossing folder

 
CAS(E) This Sketch Challenge
 
I used the same papers once again, however I stamped an image to color this time.  This image is an old one from Paper Makeup Stamps.  It's called Dandy Wishes.  I was on their team from pretty much the beginning to about the time Katie decided to go all digital.  I'm not a fan of digital images.  I much prefer to stamp.  But, PMS had some great images!  This is one that never saw ink!  What a shame because it is such a fun image!  I stamped it in Archival Jet Black onto watercolor paper and watercolored it with SU reinkers in Melon Mambo and Certainly Celery.  I also covered each of the hearts with the Wink of Stella shimmer brush, and added Glossy Accents to the large one.  The sentiment and stitching were stamped in Rose Bud Memento Luxe ink.  Both of those stamps are from PTI.
 
I followed this week's CAS(E) this Sketch.  The flower in their sketch gave me the idea to use the Dandy Wishes image.
 
Thanks for stopping by to see my cards!
 
Recipe
Stamps:  Dandy Wishes (Paper Makeup Stamps), Mixed Messages and Sew Simple Borders (PTI)
Paper:  Vintage cream, melon mambo, watercolor paper, Kissing Booth (Basic Grey)
Ink:  Archival jet black, Rose bud (Memento Luxe); melon mambo and certainly celery reinkers
Accessories:  Wink of Stella shimmer brush, Glossy Accents

Photobucket

Sunday, January 19, 2014

Freshly Made Sketches #119

 
Hi friends!  I was on a roll today and made a total of 5 Valentine cards.  One I'm not happy with, so I don't think I'll post it, but I am posting this one today and the others later! 
 
 I wanted something feminine and flowery, so I used Basic Grey's Kissing Booth paper lead the way.  I started by die cutting the floral pattern with PTI's Tipped Tops die, then the banner with PTI's Notched Hearts Banner die.  The heart was die cut with MFT's Hearts a Plenty die (I used lots of dies on this one!).  That heart was covered with a Wink of Stella brush for shimmer, then with Glossy Accents for some shine.  The little hearts on the banner were also given some Wink of Stella shimmer.  I stamped the sentiment in Memento Luxe Rose Bud ink with PTI's Mixed Messages stamp.  Lastly, I added some crystal hearts. 
 
I followed this week's Freshly Made Sketches and flipped it on its side.
 
Thanks for stopping by!  I'll be posting some of my other cards tomorrow.
 
Recipe
Stamps:  Mixed Messages (PTI)
Paper:  Vintage cream, melon mambo, Kissing Booth (Basic Grey)
Ink:  Rose Bud (Memento Luxe)
Accessories:  Tipped Tops and Notched Hearts Banner dies (PTI); Hearts a Plenty (MFT), glossy accents, Wink of Stella shimmer brush, crystal hearts

Photobucket

Saturday, January 18, 2014

Just Us Girls #224 - Color Challenge

Happy Saturday!  This week over at Just Us Girls, Vicki chose this color challenge that just happens to be one of my most favorites!  I love blues and browns/kraft. 
 
This card kind of took on a life of it's own.  I started out with the intention of just making a tag, then it evolved!  The tag was die cut out of watercolor paper and colored with Baja Breeze reinker and water.  Then I took Pumice Stone and Broken China distress paints and dropped some paint mixed with water on the tag.  Love that look!  The hello die was created by adhering strips of Kraft, Baja Breeze, and Marina Mist cardstock onto a scrap piece of cardstock and then die cutting the word.  The flower was die cut from felt in Kraft and blue.  The cream background was run through a mesh embossing folder.  I added some Wink of Stella shimmer to the word, but it's difficult to capture the shimmer in the photo.  I added some seam binding to the tag as well.
 
You can see more from the team and our Guest Designer at these blogs.
 
 
Thanks for stopping by!
 
Recipe
Paper:  Vintage cream, baja breeze, marina mist, kraft, watercolor paper
Ink:  Baja breeze, pumice stone and broken china distress paints
Accessories:  Quote tag die (Paper Smooches), Beautiful Blooms II #3 (Papertrey Ink), felt, mesh embossing folder, seam binding, Wink of Stella brush, star dust stickles


Photobucket

Monday, January 13, 2014

Watercolored Gladiolus

Hi everyone!  I had to make a sympathy card for someone at work, and while I was making it I got a message that the mother of my partner teacher passed away today.  So I'll be posting another sympathy card.
 
I've known for a few days about this sympathy card, and I've been batting around some ideas about what I wanted to create.  I've been seeing Anna Wight doing some awesome watercoloring lately, especially this one!  I fell in love with it and knew I had to create something along those lines.  So this is my card, but it is no where near Anna's lovely creations!
 
I started by stamping the flower with Archival ink on watercolor paper which was cut with a pierced rectangle.  Then I used SU reinkers in Pink Pirouette, Blush Blossom, Cameo Coral, and Old Olive to color the flower.  Soft Sky reinker was used around the flower for some shading.  I went over the flower with a Wink of Stella brush for some shimmer.  It wasn't enough, so I added a dot of Star Dust Stickles in the center of each flower.  The sentiment was stamped in Archival ink also.  The background of the card was stamped with SU's En Francais in Smoky Slate.
 
I'm already thinking about the next sympathy card I have to make.  I've got to see what other stamps I have that would be good for watercoloring.   Thanks for stopping by!
 
Recipe
Stamps:  Year of Flowers: Gladiolus, Boutique Borders:  Sympathy (PTI), En Francais (SU)
Paper:  Vintage cream, watercolor paper, black, Delightful (Authentique)
Ink:  Pink pirouette, blush blossom, cameo coral, old olive, soft sky SU reinkers, smoky slate, Archival jet black
Accessories:  Pierced rectangle stax die, Wink of Stella shimmer brush, star dust stickles


Photobucket

Saturday, January 11, 2014

Just Us Girls #223 - Technique Challenge

Hi everyone!  Today over at Just Us Girls, Sharyn is hosting the technique challenge and she chose paper piecing.  It's a simple technique that adds so much to an image.
 
I've been seeing so many Valentine cards around blog land, so I decided to make one for my hubby.  And whenever I think of paper piecing, I always think of MFT stamps, specifically the Pure Innocence girls.  I love paper piecing their dresses!  But then I came across this set called Little Loveosaurus and I thought it would be adorable paper pieced.  (I think it's retired because I couldn't find it on their site.)  I love the sentiment too!  I stamped the image on Yours Truly dp from Echo Park and cut it out.  I also stamped it on white cardstock and colored the head, teeth, and triangular things on its back and tail.  I added Wink of Stella shimmer on those triangular things and the teeth, then added glossy accents on top.  It really makes it shimmer!  I did the same with the small red hearts.  The sentiment was stamped on the word bubble die.
 
You can see more fabby paper piecing from the design team and our Guest Designer at these blogs.
 
 
Thanks for stopping by!
 

Recipe
Stamps:  Little Loveosaurus (My Favorite Things)
Paper:  Neenah white, real red, basic gray, Yours Truly (Echo Park)
Ink:  Memento tuxedo black, Versafine onyx black, copic markers
Accessories:  Spellbinder's heart dies, word bubbles die (Paper Smooches), Martha Stewart heart punch, glossy accents, dimensionals, Wink of Stella shimmer brush

Photobucket

Thursday, January 9, 2014

Tissue Box Cover

Hi everyone!  I made this tissue box cover a while ago that my friend Diane Zechman designed a while back.  You can find the tutorial on Splitcoast Stampers here.  That one was made with a fall theme and I never changed it!  My plan was to make one for each of the seasons, but that never materialized.  So I finally made a winter themed cover. 
 
I searched high and low for some snowflake paper in my stash and I had lots, but most was in the 6x6 pads and I didn't have enough.  I found this old SU paper called Wintergreen which had just what I was looking for.  I used two different patterns from the pack and white cardstock as my base.  The lace is actually a lace tape that I purchased at AC Moore I believe.  The snowflake was cut from grunge paper and white cardstock, then glued together for some stability.  Then I covered it with glossy accents and clear rock candy distress glitter and a blue glitter dot.  These are just so pretty and actually very durable.  I forgot to take a picture of the top.  The top is cut with a decorative Spellbinder's die.
 
That's it for today.  Thanks for stopping by!
 
Recipe
Paper:  PTI white, Wintergreen dp (SU retired)
Accessories:  Lace tape, Let It Snowflakes die (MFT), clear rock candy distress glitter, glossy accents, glitter dot, Spellbinder's die


Photobucket

LinkWithin

Blog Widget by LinkWithin