Friday, September 30, 2011

Resist the Temptation

My niece posted on Facebook last Sunday that it is just three months until Christmas. It is going to fly by, just like this month did! But I'm ahead of the game this year because of the Christmas Stampin' All Year Long challenges.  I have so many cards/3-D items in my stash that weren't there this time last year!  Yeah me!

This week we are sponsored once again by Perfect Presentation.  The challenge is called "Resist the Temptation"....no stamping!  With all the embellishments and beautiful papers out there, this was an easy one.

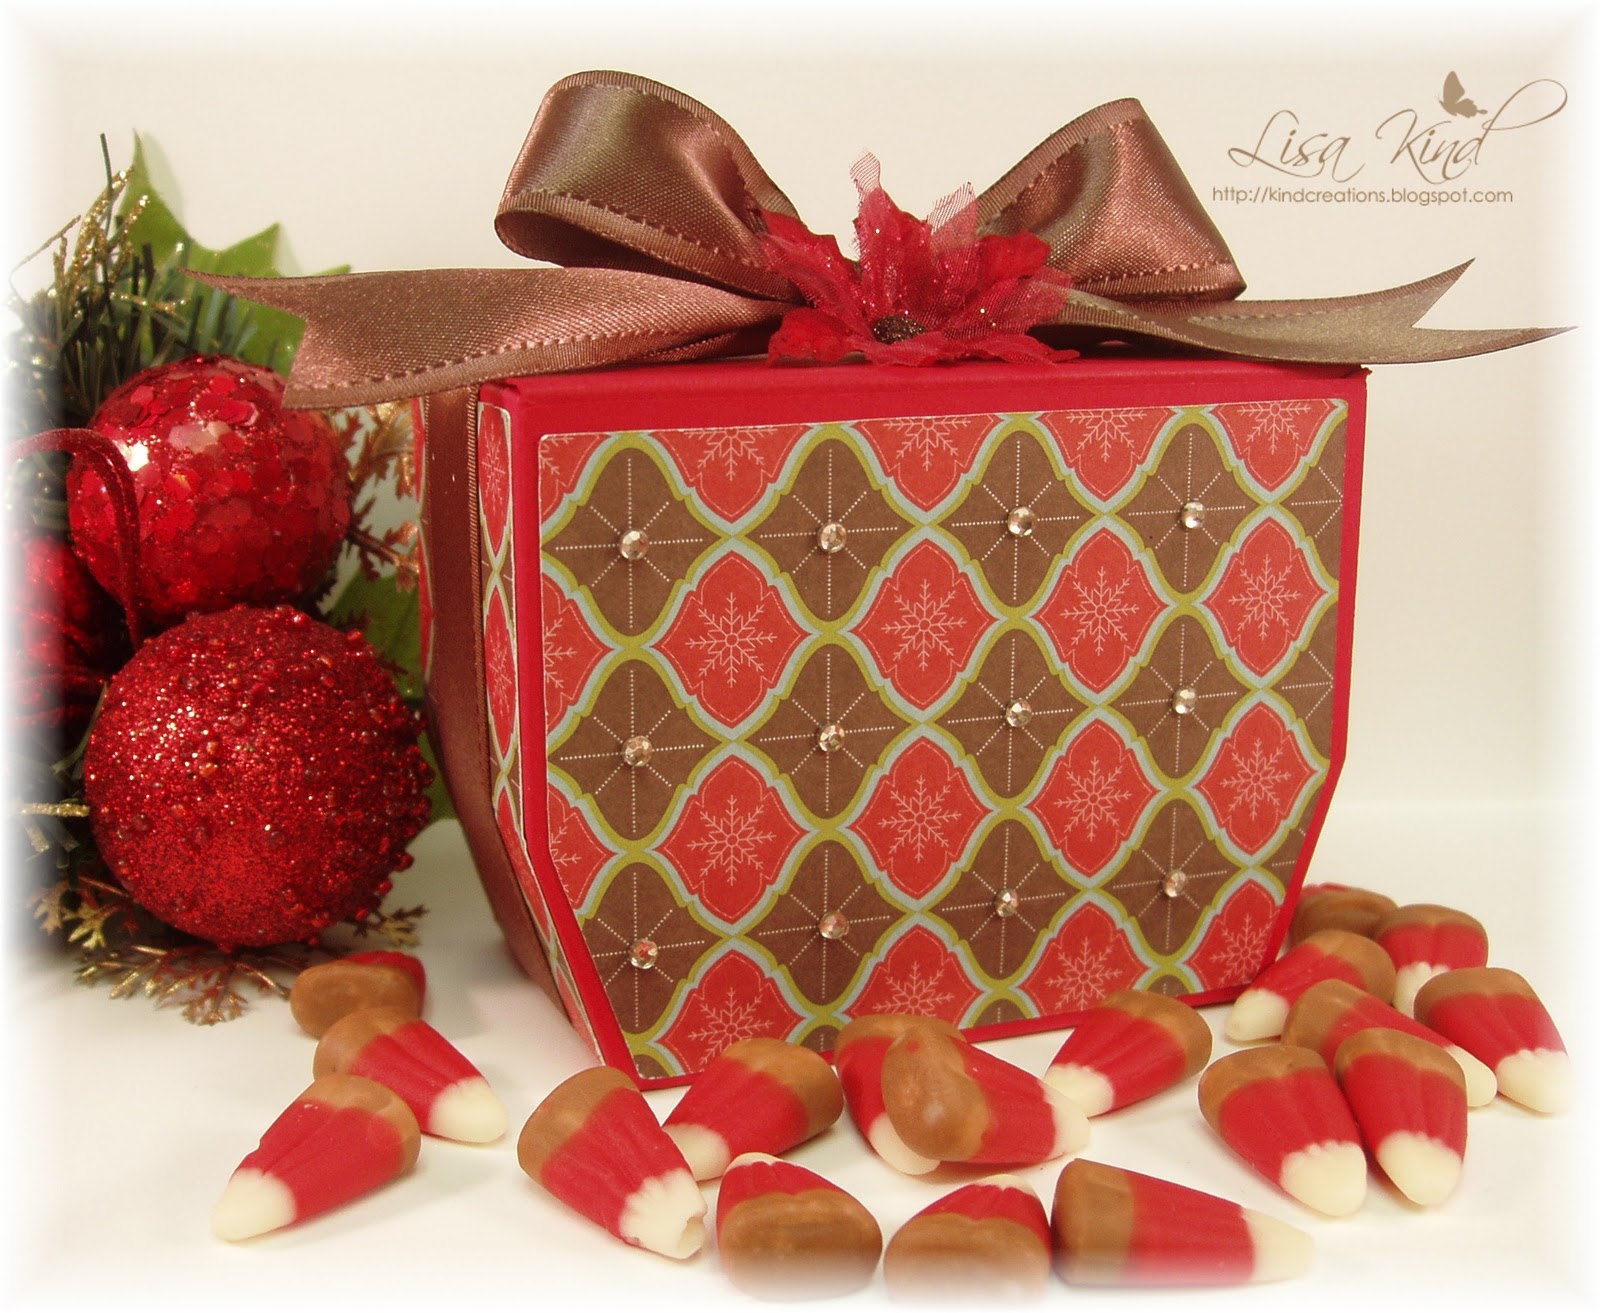
The template I chose to use is called Perfect Parcel.  This is the cutest little template!  I thought it was going to be bigger, but it's the perfect size for some candies inside.  I recently saw these candy corn candies in a caramel apple flavor and bought them because I thought I could use them for one of my Christmas projects.  This little template was the perfect one for it.  You can fit a nice bag of these in the box.  The colors inspired me to use this retired dp from SU called Holiday Treasures.  I can't get enough of this paper...LOVE it!  All I did was cut the template on my Circut with the red cardstock and the panels from the dp.  I then tied it up with this beautiful chocolate satin ribbon (also SU, retired I think).  I was going to put the poinsettia flower on the front of the box, but it didn't look right.  So I added it on top covering the knot.  The front then looked so plain, so I added crystals to the chocolate designs on the dp.  That's it!  Sooo simple and stunning!
If you want to see more inspiration from the CSAYL girls, stop by the CSAYL blog.  They never disappoint!  And if you play along with us, you will have a chance to win a template of your choice from Perfect Presentation!  Thanks for stopping by and I love your comments!  Have a great Friday!

Photobucket

Thursday, September 29, 2011

My Time Made Easy October Preview

Hello friends!  Gosh, it's the end of September....seriously, where has this month gone?  I don't ever think a month has passed me by so quickly!  I guess it's because it was such a busy month for me!

Anyway, one good reason to get September out of the way is to make room for the new release from My Time Made Easy, which is anxiously waiting in the wings for you!  The new release is chock full of gift giving goodness!  I'm here today with the first preview day.  I've used the new template called Topped Off.  What a cute little template this is...and Lauren has given you all sorts of options to "top it off" with! 
This is what the template looks like with the top on.  The lid is actually just a little square that fits into the top of the box (I didn't take a picture of it...but Lauren has one that you can see on her blog).  I've used the previously released Perfect Poinsettia cut file to "top off" my box.  There are three other options to top it off that comes with the template.  So versatile!
Here's the box open.  I used a new pattern paper from the new Mrs. Candy Claus digital paper pack.  (We have three new digital paper packs being released this month too!)  I added some pink Perfect Pearls around the perimeter of the decorative mats on all sides, and the poinsettia has been edged with Star Dust Stickles for some sparkle. 

I thought this would make a cute hostess gift to give to that perfect hostess. It's filled with Godiva strawberry truffles.  I loved how the pink wrapper matched the paper!  Now if I could only keep away from those delicious little buggers!  ;-)

Now you really need to stop by the other girls' blogs to see what they have up their holiday sleeves!


There's another preview day tomorrow, so check out Lauren's blog for details.  And all the new products will be ready for purchase on Saturday, October 1st!  It's all digital, so you can click and craft immediately!  Thanks for stopping by! 

PS...Did you see my cousin's audition for the X-Factor?  She's made it to the LA stage!  You can see her audition in this post.  Enjoy!

Photobucket

Wednesday, September 28, 2011

My First Submissions (and Rejects!)

Hi everyone!  I finally broke down earlier this month and submitted some cards to Paper Crafts Magazine.  They had a call for baby silhouettes, and Paper Makeup Stamps was releasing some baby silhouettes that same month!  Serendipity...or so I thought! 

So a-crafting I went and submitted two cards.  I used the newly released Shelby Fairy Silhouette.  This first one was created and sent off without even thinking about it!  It was like pulling the bandaid off quickly!  When I took another look at it a little later on, I thought that this one would not be picked up.  While I really like it, I thought it was a little blah...I could have added more black layers to make the dp pop a little more.  I do like the ribbon treatment, though.


But the with the next one, I took more time and thought this one just might get picked up.  Alas, it wasn't!  But I really like this black, hot pink, and kraft combo!  I think this is Graphic 45 paper (I didn't write it down cause I listed all my supplies when I submitted it.)  I thought the text printed on the flower was a nice match to the print on the dp.


So I guess I was a little naive, but I think I'll try again when the next call suits my crafting style.  What do you think?  Thanks for stopping by!

Photobucket

Monday, September 26, 2011

My Cousin Auditioned on X-Factor!

***This is not stamping related, but it is entertaining nonetheless!***

Hi everyone!  I just thought I'd share this here on my blog.  My cousin Cathy's daughter, Caitlin Koch, auditioned for X-Factor in front of Simon, Paula, Nicole, and L.A. and got rave reviews!  She is off to Los Angeles! She has always been very talented and has sung at various family occasions.  It's so amazing to see her in front of these judges!  Watch the video and see for yourself!
If you like her and watch the show, consider voting for her.  It would mean a lot to her and our family!  Thanks for watching!

Photobucket

Saturday, September 24, 2011

Just Us Girls - 3-D/Template Challenge

Happy Saturday everyone!  I've been so waiting for this day!  I need a restful weekend!  It's been a crazy couple of weeks!  Anyway, I'm finally back with my beloved JUGs girls!  This week Maria has a great challenge for all of us.  She loves fall, as do I.  It is my favorite time of year.  I love the cooler temperatures, the colors, and my comfy sweaters!  So the challenge is to take a box you have around the house (think recycling) and alter it with a fall theme.  My friend Diane Zechman created a great tutorial for a tissue box cover which she posted on Splitcoaststampers in the resources section here.  So I used her tutorial and created this fall-themed tissue box cover.
I created the base of the box from crumb cake cardstock according to the instructions.  Then I used this paper from PTI called Fall Prints and Patterns to decorate it with.  I added the ivory scalloped crocheted trim around the lid of the box.  The leaves were cut with Cuttlebug dies and the pumpkin in the middle is a button.  I just cut the shank off of it so it would sit flat.  I then added some scrapper's floss that I curled.  This was a super easy project to create.  I think I'm going to make these for the secretaries at school because they've been so helpful to all of us 5th grade teachers that are new to the Middle School.  They really are the heart of the building!

Stop by the JUGs blog to see the fabulous fall-themed creations the girls created.  Don't forget that our JUGs team is looking for a new member!  You can see the details here.


Thanks for stopping by!

Photobucket

Friday, September 23, 2011

Christmas Stampin' All Year Long - Clean and Simple

Happy Friday everyone!  I haven't been posting much because my mom has not been feeling well and I was tending to her, but I did find time to create this week.  This week over at Christmas Stampin' All Year Long, we are being sponsored by Karber Digital Images
We were all given this cute Rudolph image to work with.  The challenge this week at CSAYL is to create a clean and simple card.  So I headed right to the Clean and Simple challenge blog for a sketch and went creating.  Here's what I did.
I started with a Crumb Cake base and ran the front of it through the linen impression plate from PTI.  Then I chose this paper from Eskimo Kisses by Basic Grey.  It matched nicely with the image.  The scalloped border is Purely Pomegrante and was punched with an SU punch.  The image was sized to fit into this nestie, printed on my computer, and colored with copics.  I added some Star Dust Stickles for some sparkle.  The sentiment is from PTI (I wrote down the set, but misplaced the piece of paper I wrote it on!), and was stamped in the Purely Pomegrante ink.  Easy peasy and clean and simple!

If you play along with us this week, you could have the chance to win two digital images from Karber Digital Images.   Stop by the CSAYL blog to get more details and see more inspiration from the team!
Thanks for stopping by today!  I'm hoping to have more crafty days coming up!  See you soon!
Photobucket

Sunday, September 18, 2011

Pretty Palette #27


Hi everyone!  It's Sunday and time for another Pretty Palette color challenge from My Time Made Easy.  The girls were a little stumped by these colors this week and quite frankly so was I!  I cannot remember where I got the inspiration for them either!  But I managed to pull something together.
I had a difficult time taking the photo for some reason.  My battery was low...maybe that was the problem!  I started with a chocolate brown mat that I ran through a Sizzix folder in a circle pattern.   I topped that with some green dotted ribbon and the dp from Delovely by Cosmo Cricket.  The image and sentiment are from MTME set called On Display 1.  I used the digi set so I could easily add the gumballs inside the gumball machine.  Then I colored it with copic markers and cut and embossed it with a rectangular nestie.  The sentiment was stamped in Versamark and embossed with white embossing powder.  I randomly added some crystals...don't know if I like that, but it needed something.  Lastly, I added Crystal Effects to the gumball machine to look like glass.  I used this week's Clean & Simple sketch (love those).
Stop by the MTME blog to see more inspiration.  I said the girls were stumped, but they really did a fabulous job with these colors!  We'd love to see what you can do with them!  Thanks for stopping by!

Photobucket

Sunday, September 11, 2011

Paper Makeup Stamps - September Release in Review


Did you see all the fun stuff released this week from Paper Makeup Stamps?  You can see them all here in the PMS store.  Today is the last day of reviews for this release, and I have this cute image called Beyond Measure.  It's from a NEW line called Color Kids.  We released three of them this month and they are so adorable and fun to color!


 I started with a sketch from Card Positioning Systems and a new paper pack from Authentique called Blissful.  I picked this up at a stamp show I went to a couple of weeks ago.  I love the yellows, grays, and black in this dp.  I colored the image to match the dp.  I used the X-Press It Blending paper for the image.  I usually use PTI's white paper, but I thought I'd give this another try.  It worked fine for my image.


Stop by the PMS blog to see more of the new release and creations from the PMS team.


Thanks for stopping by today!  Have a great week!

Photobucket

Pretty Palette #26 - Time to Remember

Hello everyone!  Do you remember where you were on this day 10 years ago?  I was in my classroom watching both World Trade Center towers fall (without kiddos there of course!) on the television. Such an unbelievably emotional day.  Even today, it still seems like it was just yesterday.  But life goes on and we do what we can to remember those who lost their lives unnecessarily.  So the Pretty Palette girls decided to use the red, white, and blue colors again (we used them for the Fourth of July week) out of respect and to show our patriotism.  I added this iconic picture to the graphic.  I think it shows how resilient we are.


I also decided to use it on my card.  I chose to use the Round Up digital stamp set.  I just changed the colors to red and blue using the free GIMP software.  I added the sentiment from Bold Botanicals...a fitting sentiment, I think.  Then I cropped the picture into a circle and added it to the tag.  The tag was then cut using the Round Up cut file and my Cricut (with the SCAL software).  The white panel was run through the stars embossing folder and the strip on the side is from the Bo Bunny Liberty Collection paper pack.  I added some star bling for some sparkle.


I loosely used the Fall to Layout sketch from Clean & Simple, but the Pretty Pattern sketch this week resembles the US flag, so you may want to check that out here.


Please check out the MTME blog for more inspiration.  The girls did a wonderful job with these colors again!  Thanks for stopping by!

Photobucket

Saturday, September 10, 2011

Just Us Girls #101 and Blog Candy Winner

Hi everyone!  Thanks so much for all the wonderful comments and congratulations on our 100th JUGs challenge!  It's so nice to know you like our little challenges we put out here!  We all had blog candy to give out and using Random.org I chose #10 comment Carla Suto to win mine!   Congratulations Carla!  Please contact me at lakind@roadrunner.com with your address so I can get your goodies to you!
Our challenge this week is brought to us by Dana  and she's asked us to use multiple text/sentiments to make a background or focal point.  As you can see, I don't have a sample for you.   I've had such a trying week.  School started and my 5th grade team was moved to the Middle School and my head is spinning. It's so different from our elementary school!  So I'm not playing this week.  But head on over to the JUGs blog and see what the girls have created! 

Thanks for stopping by!

Photobucket

Wednesday, September 7, 2011

Paper Makeup Stamps Release Day Blog Hop!

We are finally here!  Release day at Paper Makeup Stamps!  We've been sneaking fabulous images for the past four days, and now is the day you can actualy purchase them!  We are starting today with our blog hop.  So if you just stopped in, please go to the PMS blog to get all the details about the hop.  If you came here from Janette's blog, you are in the right place!

I'm using one of the new wordart singles.  I love this sentiment!  So "colorful"!!
I was searching for sketches and came upon this one from Taylored Expressions.  I'm not a fan of banners, but I really liked this one because of the bigger banner.  I like Basic Grey's Junebug dp because of all the fun colors in it, so I chose five different patterns and went a-cutting!  After I cut the banners, I ran the white piece through PTI's linen impression plate.  I can't see to leave a blank space blank...I either need some texture with an embossing folder/impression plate or some sort of embellishment!  I adhered the banners to the textured white piece, then stamped the sentiment.  I masked off the word "color" and inked the rest in Memento Tuxedo Black ink.  Then I colored each of the remaining letters with a different color SU marker.  Lastly, I adhered the Mandarin Orange baker's twine and bows with monoadhesive glue.  The base of the card is SU's new Lucky Limeade cardstock.  That is fast becoming a fav of mine!
So now I have to send you off to the next blog.  But before you go, my letter for you is S.  Don't forget that we are partying tonight in the PMS forum!  Lots of fun and prizes!  Invite some friends...we are giving away extra prizes for those who bring friends!  The more the merrier!

Now, off you go to Andrea's blog!  She's going to have something fabulous I just know it!  Thanks for stopping by today!  See you later at the party!

Photobucket

Tuesday, September 6, 2011

Paper Makeup Stamps Sneak Peek Day 4 - Word Art

Hi everyone!  Today is Day 4 of sneaks from the Paper Makeup Stamps September release.  Did you see days 1-3?  If not, hop over to the PMS blog (after you leave here of course!) to see what you've missed!  Today is all about the wordart.  PMS has some fabulous wordart in their store.  Every occasion is recognized with some fabulous phrase. 

My project for today was just a happy accident!  As I sat down to creat a card last week, I debated on how to use this wordart.  Then the light bulb went off over my head!  I was going to be watching my 7 and 4 year old nephews, Ethan and Kristoff, the next day and remembered that Ethan had his two front teeth missing!  Bingo!  So the next day I took this picture of Ethan in my backyard and edited it by using an antique option on my editing software.  Just too cute (IMHO)!  My mom didn't like this picture of Ethan because his eyes were squinting.  The sun was in his eyes no mattter which angle I shot the picture from (it was around 1:00 in the afternoon).
I used old olive cardstock for my 6"x6" base, then added a dp from Basic Grey's Offbeat paper pack.  The striped paper is from SU's retired Fall Flowers and matched perfectly. 
The paper the tag (cut with a nestie) was cut from is from the Basics Manila paper pack, also by Basic Grey.  The super cute sentiment was stamped in old olive ink and stamped right on the manila dp.  All I had to do to finish it off was add a button tied with SU twine.  Super easy and something for my niece to cherish!  (She loved it!)

Now we have a bevvy of PMS Makeup Artists posting today.  You can see their creations on the PMS blog and on their personal blogs.


Tomorrow is our Release Day Blog Hop all day and Release Party at 9:00 pm EST in the PMS forum.  We hope to see you there!  See you tomorrow!

Photobucket

Monday, September 5, 2011

My Time Made Easy - A Year in Review

Happy Labor Day to all of our US friends!  I'm spending the day with friends and family at our cabin.  In fact, we've been there all weekend.  It's a bittersweet weekend for me...back to work tomorrow!  I can't complain, though.  I've had a splendid summer, the highlight of which was my trip to Poland to visit relatives. 

So, did you enjoy this month's My Time Made Easy release and do some shopping?  I hope so!  Today the design team is reviewing products previously released.  The template I'm using is the SK8 Board Box.  It was a middle of the month release, so I never got a chance to use it.  When I first saw it, I immediately thought that it looked like a tombstone.  (Apparently Monique thought the same thing.  We revealed these to each other within a few hours of each other and were definitely on the same wave length!  You have to see hers here.)  I cut it out of black cardstock and added the decorative layer which is from SU's retired Night and Day dp (I think that's the name of it).  I stamped the spider web and spiders from A Spooky Surprise.

The label is the new Pretty Pieces cut file Frame Me and the sentiment is also from A Spooky Surprise.  I added the black satin bow and was done!  The box opens from the bottom and is really spacious.  Pencils, pretzel logs or anything in that size could fit in there. 

Stop by the MTME design team blogs to see what they have as their year in review projects.


Thanks for swinging by my blog today!  I hope you are enjoying your Labor Day with family and friends and of course lots of good food!

Photobucket

Sunday, September 4, 2011

Paper Makeup Stamps Sneak Peek - Baby Day


 The Paper Makeup Stamps sneaks for the September release have begun!  Yesterday was actually the first day...did you see them on the PMS blog?  If not, check them out after leaving here to see all the new kids on the PMS block! 

Today is what I called "Baby Day".  We have several baby-themed images being released this month...two of which are silhouettes of previously released fairies!  We all love silhouettes, so we wanted to see some of the cute fairies as silhouettes.  I have the Shelby Silhouette fairy that I am using today.
She was a favorite of mine when she was first released and I love her just as much as a silhouette!  She's stamped with Versafine Black Onyx ink.  I find that this is the best ink for using on solid rubber images such as silhouettes.  You get a nice even inking and vivid image when stamped.  I only own the black ink, but I'm thinking of getting more colors (brown and red for sure!) to use with these images.  So, I stamped the image then cut and embossed it with a nestie.  Then I swirled some pink ink around the image (while still in the die) and then went over that with some antique linen distress ink.  Love how I got a sort of peach tint to match my dp (totally not planned either!).  The paper is Graphic 45's Once Upon a Springtime (floral) and Curtain Call (black dotted).  Oh how I love Graphic 45 papers!  The flower was created using PTI's flower and leaf dies and felt.  A pretty antique brad (compliments of my sweet friend, Michele Ghent) holds the flower together.  The sentiment is from Little Moments....that set is so versatile and I find myself using it over and over!  The sketch was last week's Sweet Sunday sketch. 
We have several of our PMS Makeup Artists (designers) and a guest posting new images today.  And they are.....

Kristi, guest Makeup Artist

You can also stop by the PMS blog to get more details on today's release.  Don't forget that our Release Day blog hop is Wednesday, September 7th and our Release Party is the same day starting at 9:00 pm EST.  You can join us in the PMS forum for some fun!  Hope to see you there!

Thanks for stopping by today!

Photobucket

Pretty Palette #25

Hi everyone!  I'm here with another Pretty Palette challenge from My Time Made Easy.  Speaking of which, did you see the new products that were released on Thursday?  You can see them all here.
For my card this week, I used a couple of cut files - one old and one new. I used this week's Clean & Simple sketch. The vertical element on the sketch reminded me of a telephone cord (on the older phones!), so I use this telephone image from On Display 1 digital stamp set. I changed the colors (it was black) to the Pretty Palette colors. Then I remembered that MTME had a cut file called Random Ribbons that had this curly ribbon image in it. I cut it out of celery and olive papers and cut them in half and layered them together. Then I added this turquoise ribbon (from JoAnn's) in the middle. The ovals were cut using the new Simple Tags Open cut file. I just used the plain oval and resized a second one to 85% so I could layer them and stamped the sentiment from On Display 1 acrylic stamp set. The background was embossed with a numbers embossing folder.

You can get more inspiration on the MTME blog and from the Pretty Palette design team's blogs.


Thanks for stopping by today!  Have a great weekend!

Photobucket

LinkWithin

Blog Widget by LinkWithin