 Hi everyone! I happened to see this Top Ten hop on Anita Hovey's blog, and checked out the link to Suzi's blog (who started this fun hop). So I went through my blog for 2010 and decided that I had to do a top 10 cards and a top 10 templates (since I LOVE my templates)! So here are my Top 10 Cards.
  This was done for a JustRite hop and I gave this to my mom for Christmas and made another for my in-laws. I think it's my favorite of the year!
  I went to a workshop at my LSS, Buffalo Stamps & Stuff, and learned a new technique from Wendy Vecchi (from Ranger Industries). I LOVE orange and it paired so nicely with the gray. The Paper Makeup Stamp was perfect for this technique.
  My friends Cheryl, Tracy, Debbie, and I entered the Paper Works Ultimate Summer Challenge and ultimately ended up winning! This is the card I entered for the team challenge.
  I used this Flourishes image to make this card for my MIL's birthday. I'm not a fan of purple, but I loved how this card took on a vintage feel.
  There was something about this card that I just loved. I think it's the colors...some of my favorites! I love the image from Paper Makeup Stamps called Rose.
  I remember seeing this layout from Taylored Expressions and loved it. I used this set from Paper Makeup Stamps to create this fun card. I love the raindrops!
 Oh, I love the colors in this one! PMS had an inspiration challenge using a picture of a room from Pottery Barn, I believe, that had an arched window in the picture. I used that as my inspiration along with those great colors!
  I love the layout, colors, and image (from PMS) in this fresh and fun card! I had fun layering the fruit in the image to get some great depth.
  My final Top 10 card is this one. I'm a teacher, so hello...this is right up my alley! I made it for a student who gave me a very nice gift at the end of the last school year. It screams school, doesn't it? Image and sentiment from PMS.
Well that's it for my Top 10 Cards. Now I just have to share my Top 10 Templates. I hope that's ok. If not, just ignore this section!
 This was my first project as a design team member for My Time Made Easy. The Shop Around template was a mega template with lots of design options. I love dogs, so I used a dog theme!
 And speaking of dogs, I made this dog house for my PMS DT member, Stephanie, as a gift for her new puppy, Butterball. It's a MTME template as well.
 I made this for a Just Us Girls template challenge. It's from Kelleigh Ratzlaff Designs. I love how that basket looks so real and the strawberries were so fun to make!
  I think this was for another JUGs template challenge using this fun and sexy set from Paper Makeup Stamps and a MTME template. Don't you just love the sentiment?
  This was done for an Artful Inkables challenge when I was on their Design Team. I love the color of the flowers!
  Love this MTME template, PMS sentiment and the dp.
  So how cute are these? From MTME for a JUGs template challenge.
  OK, so these are even cuter! Once again from MTME and JUGs template challenge (I think!).
  I love the little ghost pleading to be released from this MTME box and the other one peeking around the corner! The colors and dp are some of my favs!
  And this is probably my favorite template of the year! I love the stacked star boxes from MTME and the colors are so festive! The poinsettia is so pretty atop these boxes too!
Thanks for sticking with me to reminisce about my Top 10 Cards and Templates of 2010. What are yours?


 The dp is SU's retired Wintergreen, and the ribbon is PTI's Aqua Mist. It doesn't look like it matches very well in the picture, but it really does look nice in person. I made a bow using the Bow Easy and added some jingle bells. The sentiment is from Inkadinkadoo's Ornate Christmas stamped in Memento Tuxedo black. See? Super simple! Kind of hard to mail with the bells, so maybe I'll give this to one of the secretaries at work so it doesn't have to go postal!
 I used a
  So you are probably wondering what this is. I should have taken a picture of the gift first! It's a picture holder. The base looks like a Christmas present and there are three holders for pictures. I used the one sticking out of the bag for my tag. The dp is from the same pack I used yesterday: The Homemade Christmas Stack from DCWV. The "ribbon" is printed on the dp, but the buttons are real. The bag is called
  I just purchased this paper pack, called The Homemade Christmas Stack from DCWV, on sale at JoAnn's yesterday. It's very county-ish, but I just fell in love with the colors and the paper is a heavier weight, perfect for templates. The design of this particular paper was perfect for this box from
  This box takes a different twist on the traditional gable box. The sides are like wings that "wrap" around the sides. I've held them together with a pretty red brad. To give it more interest, I wrapped a red ribbon around the box and added some gold and green bells to the bow.
  The tag was cut with a Cuttlebug tag. The sentiment is actually two separate sentiments from the
  I used another retired dp from SU called Frosty Day. I've always loved the non-traditional colors of this dp! I ran some bashful blue grosgrain ribbon around the perimeter of the lid and used Scor-tape to hold it in place.
 The oval bashful blue piece was cut with a Marvy punch. The flower design was stamped in chocolate chip with a piece from
 I cut a 6" x 11" piece of card stock and scored it on the short side at 1" and 5". Then turned it to the long side and scored it at 1", 5", 6", and 10". Then I just followed the rest of the instructions for the box. I cut a 3 3/4" x 3 3/4 " piece of dp (SU's retired Dashing) for the top, made this fab flower with the
  I just love these boxes because of the simplicity. And I'm in love with these paper rosettes! It looked so festive sitting on Melissa's desk, too! Thanks for stopping in today. I'll have my second Secret Angel gift posted tomorrow, so I hope to see you then!
 But I'm adding to my stash of Christmas cards (add one more thing to the list: send out cards this weekend!) with this
 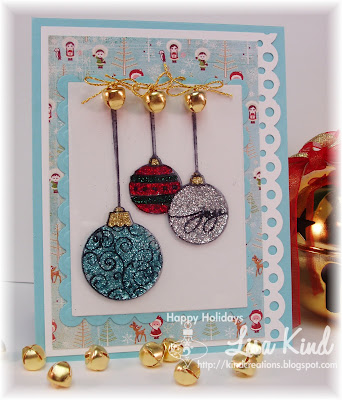 I have to admit that I was going to back out of this challenge because I thought it would take too long and I was very tired last night, but I managed to pull together some energy and try this fun challenge. There is a
  Hi everyone! Today is our
  I LOVE Christmas cut-out cookies with the anise flavoring, so this card made me chuckle! The gingerbread man is from the
 I used one of my favorite stamps sets ever from PMS,